Getting Started
When you open Spndle for the first time, a default business is created for you. If you have just the one business or side-hustle, you're ready to start logging expenses immediately.
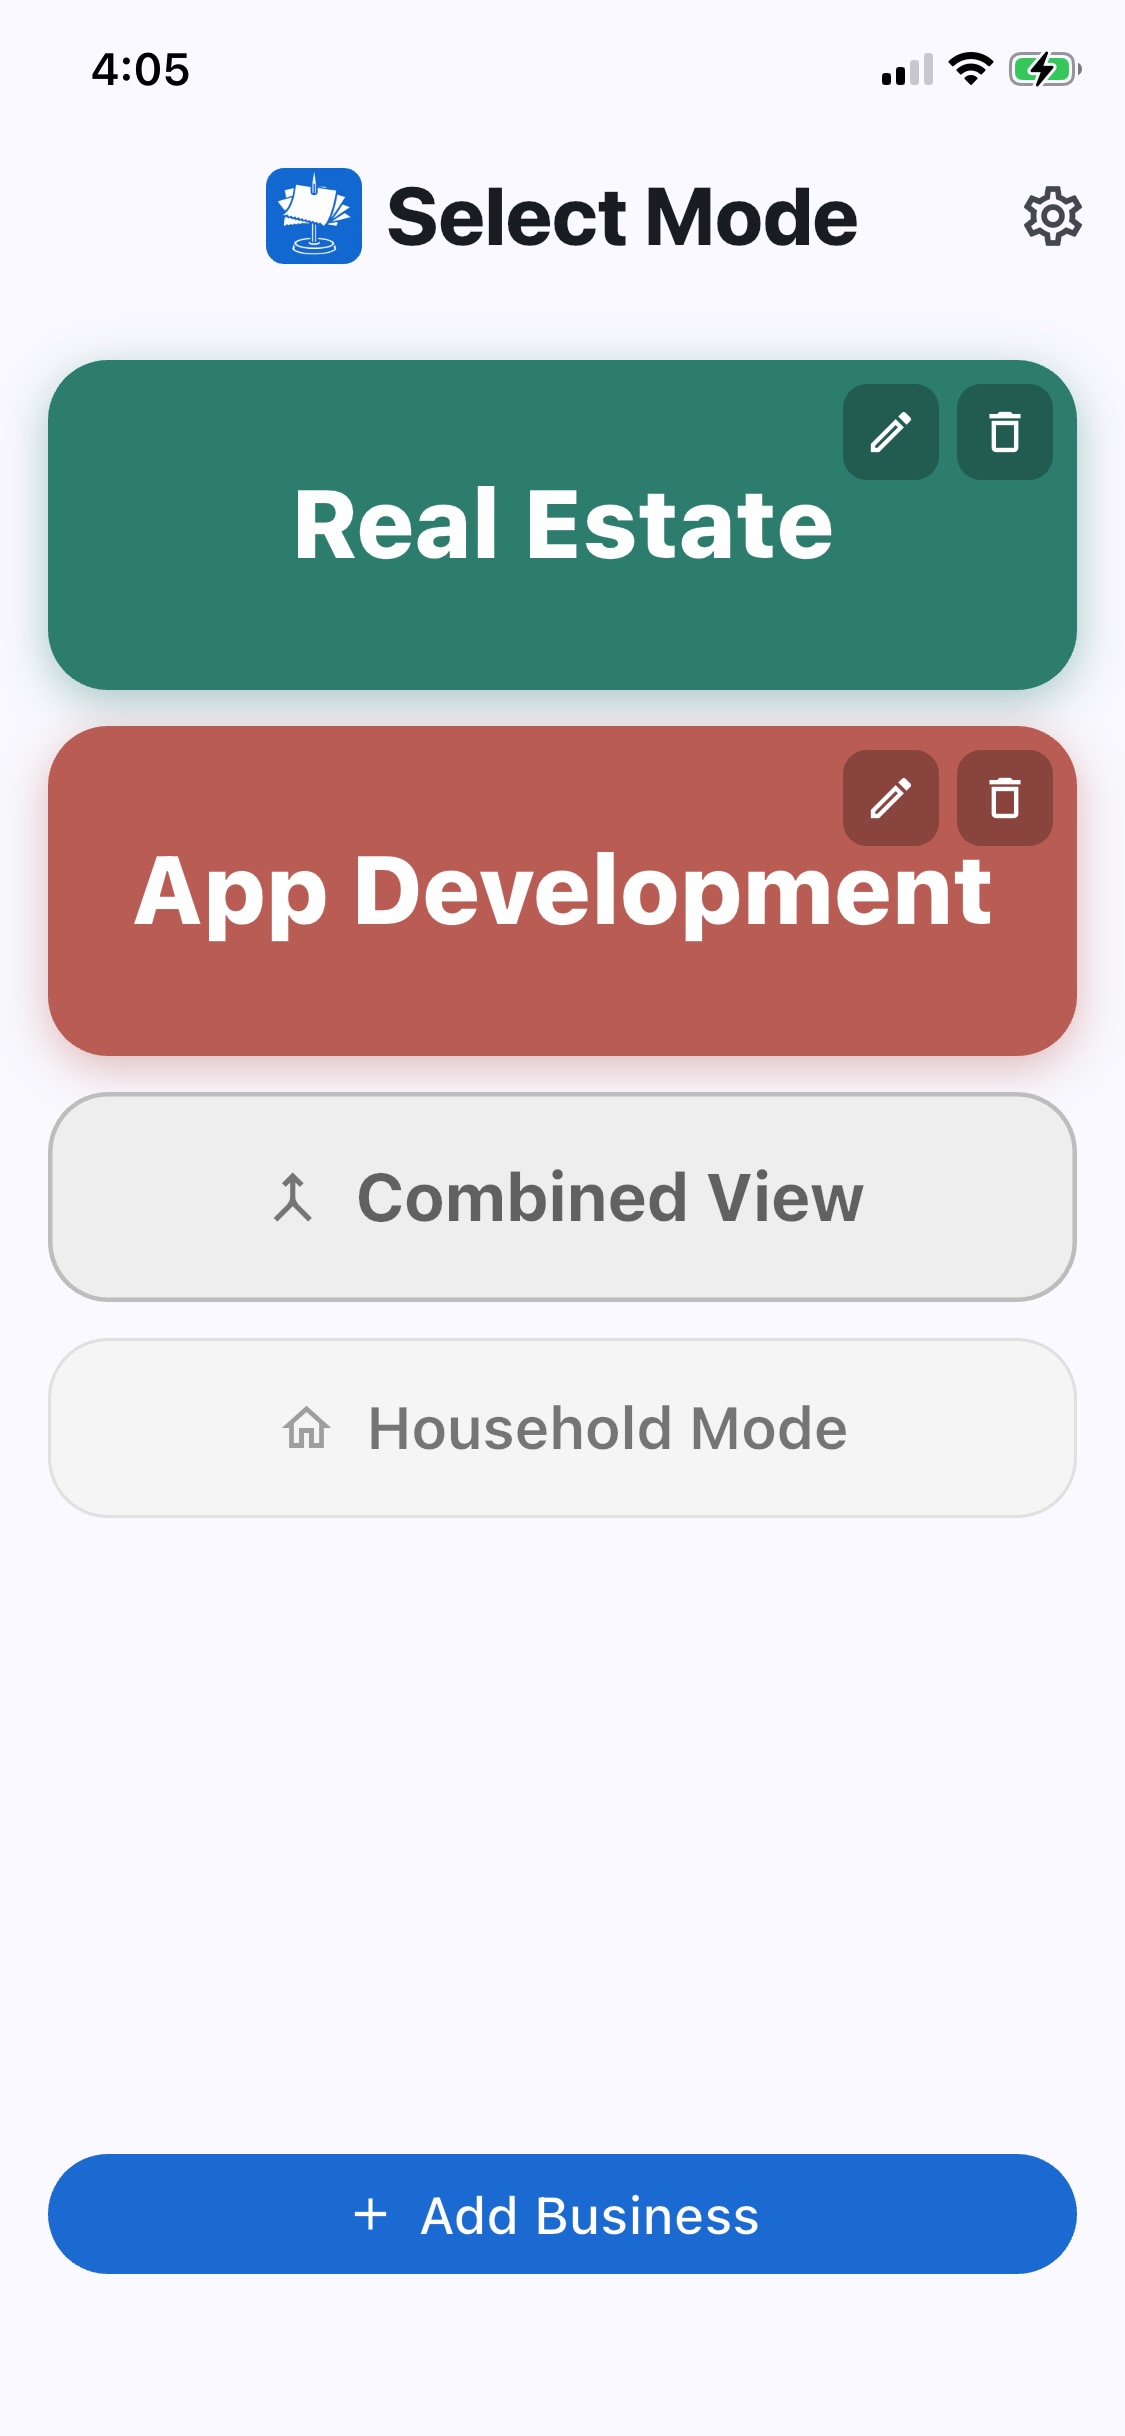
If you have multiple businesses or LLCs, tap the Manage Businesses icon () in the top-right corner to add them. Each business gets its own color, expense list, and reports.
Adding Expenses
Tap Add Expense at the bottom of the expense list. You'll be offered four options:
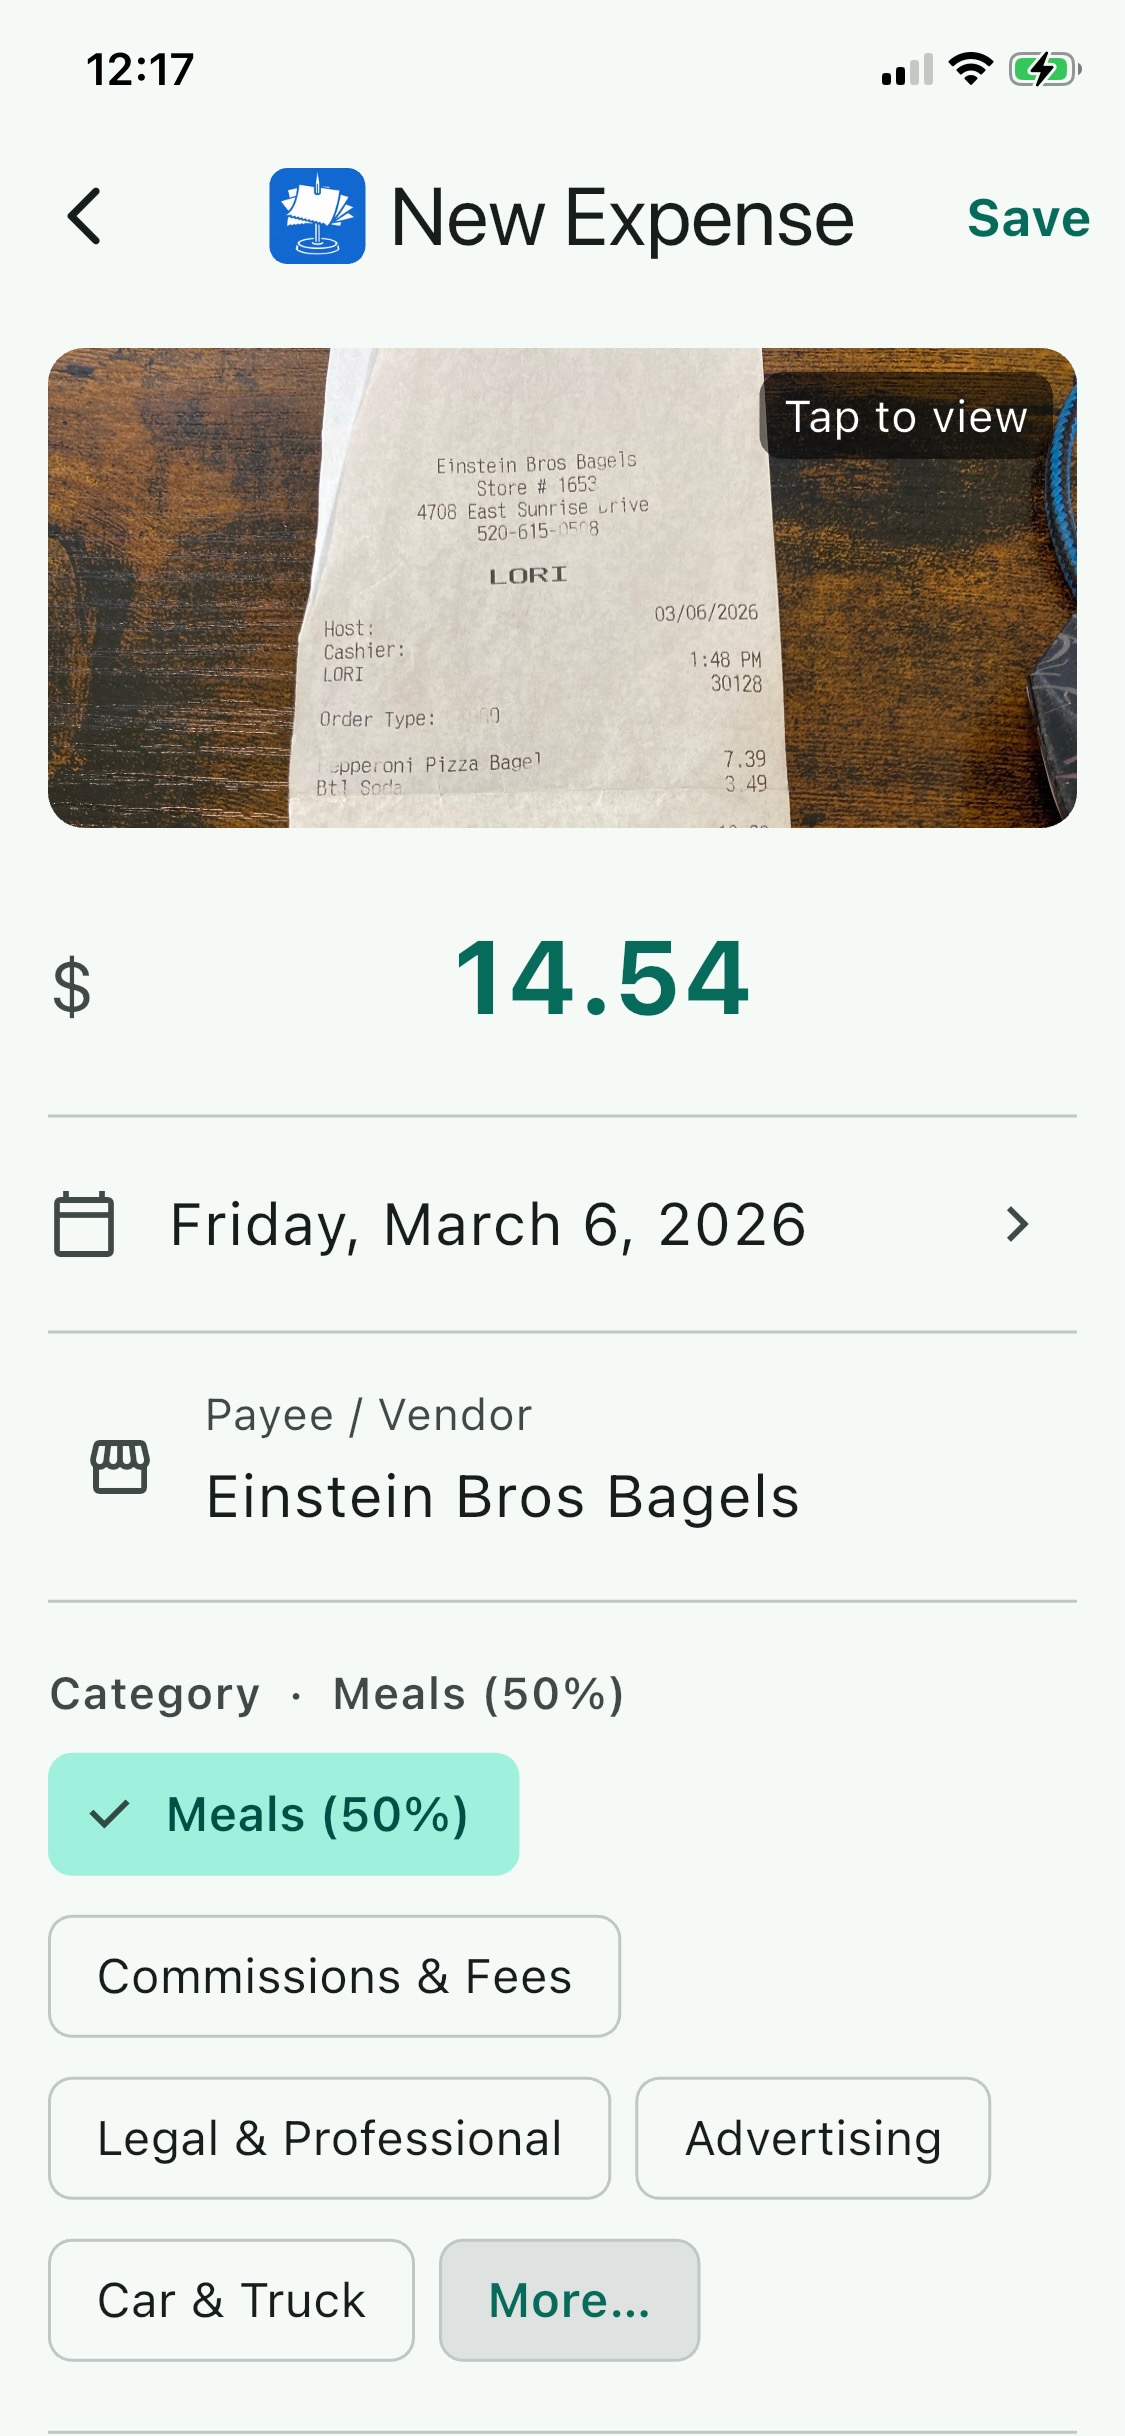
Take a photo — point your camera at a paper receipt (or a computer screen!) and Spndle reads it automatically.
Choose from library — pick a screenshot or photo of a receipt already in your Photos.
Import PDF — open a PDF invoice from Files or an email attachment.
Type manually — fill in the payee, date, amount, and category yourself.
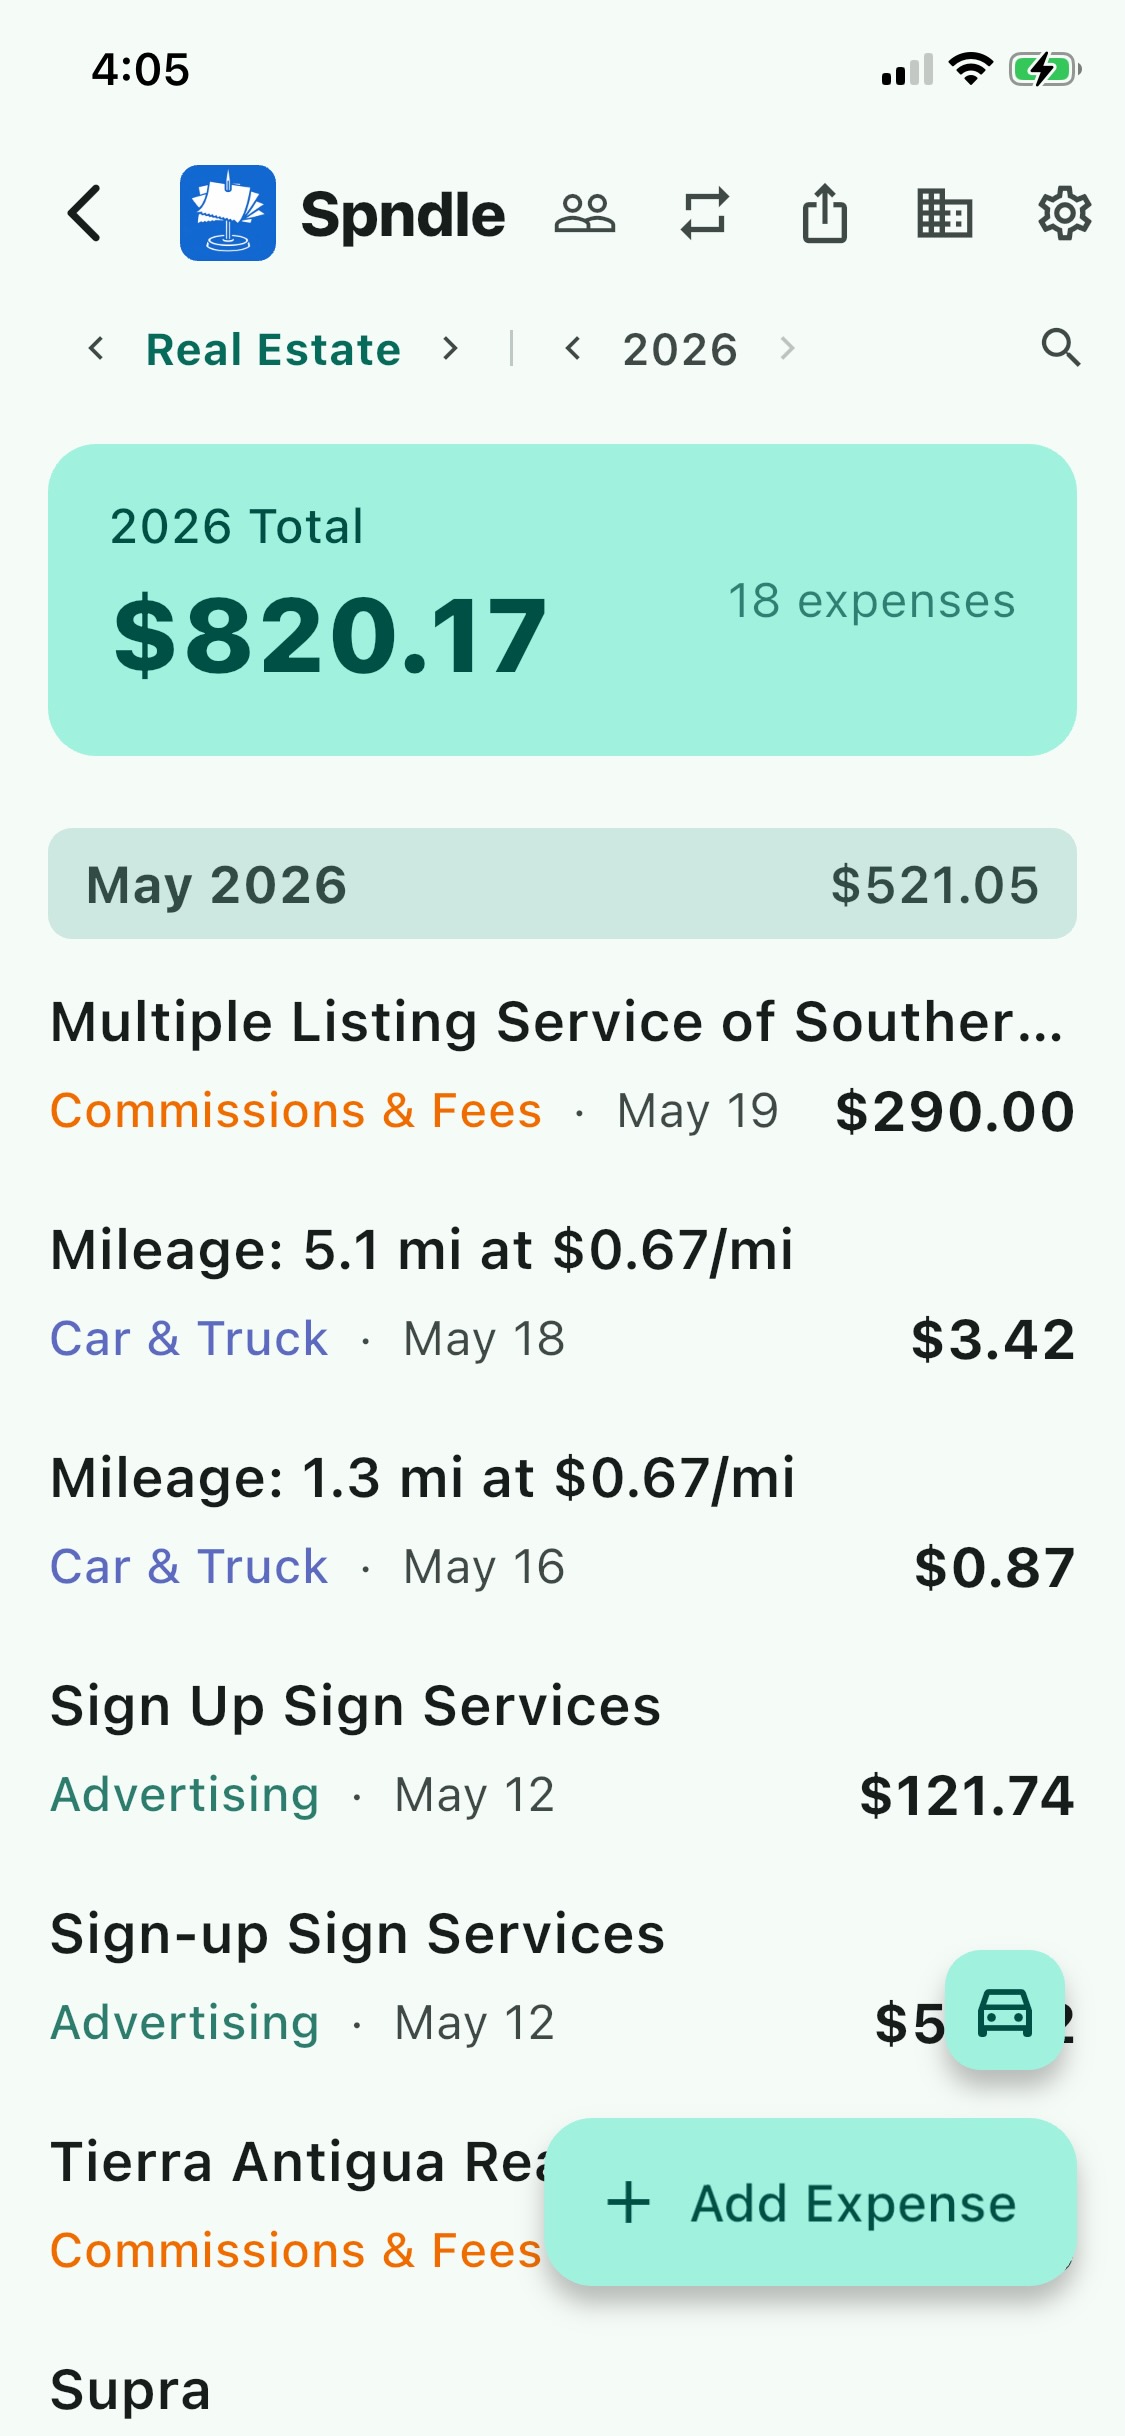
Schedule C Categories
Every IRS Schedule C line item is built in. Spndle will suggest a category based on OCR or AI recognition, but you can always change it. Categories include:
- Advertising
- Car & Truck Expenses
- Commissions & Fees
- Contract Labor
- Insurance
- Legal & Professional
- Meals (50% deductible — flagged in reports)
- Office Expense
- Rent or Lease
- Repairs & Maintenance
- Supplies
- Taxes & Licenses
- Travel
- Utilities
- Other
Smart Receipt Scanning
When you photograph or import a receipt, Spndle reads it automatically and fills in the payee, date, amount, and suggested category. There are two scanning modes depending on how you want to set things up.
On-device scanning (default, no setup required)
Out of the box, Spndle uses Google ML Kit — a mobile machine learning framework — to perform optical character recognition (OCR) entirely on your device. It reads the text from a receipt image, then Spndle applies its own pattern-matching logic to find the payee, date, and dollar amount.
- Completely private — no image ever leaves your phone
- Works offline
- Fast and free
- Works well on clean, printed receipts
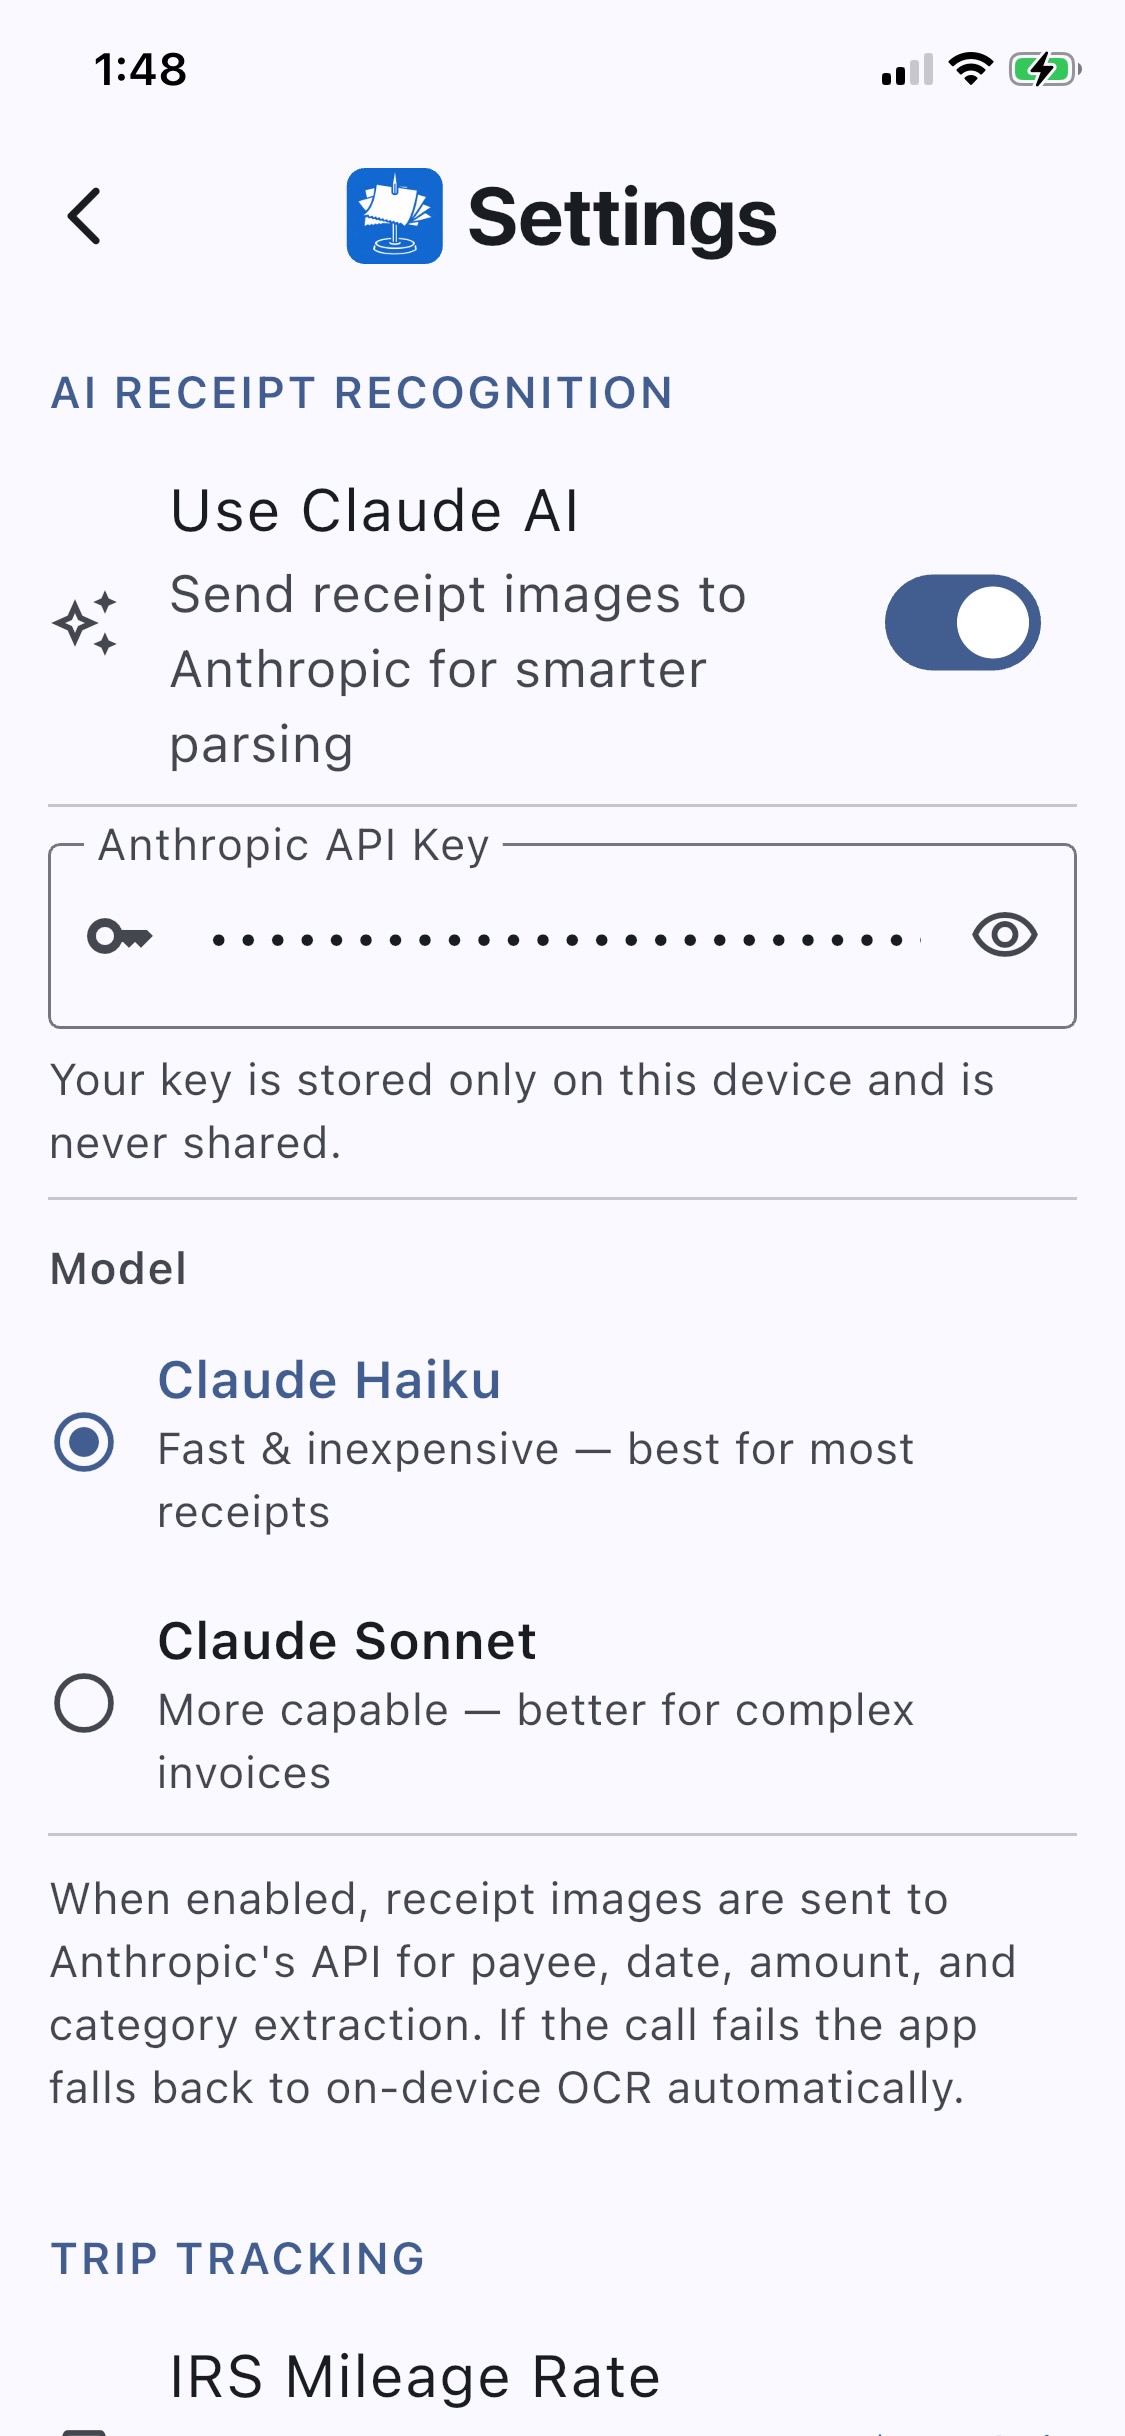
Claude AI scanning (optional, smarter)
If you enable Claude AI in Settings, receipt images are sent to Anthropic's Claude instead. Claude doesn't just read the text character-by-character — it understands the receipt as a whole. It can handle tilted photos, handwritten amounts, foreign-language receipts, multi-page invoices, and layouts that would confuse a plain OCR engine.
- Significantly higher accuracy on messy, unusual, or handwritten receipts
- Better category suggestions based on context (not just keywords)
- Requires an Anthropic API key — billed directly to your Anthropic account at a fraction of a cent per receipt
- If the Claude call fails for any reason, Spndle automatically falls back to on-device OCR
Setting up Claude AI
- Go to Settings (the settings icon () in the top-right).
- Enable Use Claude AI.
- Paste your Anthropic API key. You can get one at console.anthropic.com.
- Choose a model — Haiku is fast and costs less than a penny per scan; Sonnet is more capable and handles complex invoices better.
Mileage Tracking
Spndle tracks business mileage using your iPhone's GPS and records it as a Car & Truck expense at the IRS standard mileage rate.
Starting a trip
Tap the car icon () (small button above Add Expense) and choose Start Trip.
Grant location permission when prompted. Always Allow is required so Spndle can track distance while your phone is in your pocket.
The screen switches to Trip in Progress showing live miles and elapsed time. You can lock your phone and drive normally.
When you arrive, tap End Trip. A sheet appears to confirm the miles, add an account, and add a note before saving.
Auto-stop
By default, Spndle auto-stops a trip after 10 minutes of little movement. You can change this in Settings (Trip Tracking section) — choose any number of minutes, or set it to Never if you prefer to always end trips manually.
If a trip auto-stops while the app is in the background, you'll see the log sheet the next time you open Spndle.
Manual entry
Forgot to start tracking? Tap the car icon () and choose Enter Manually to type in the miles directly.
Multiple Businesses
If you run more than one business, tap the business icon () in the top-right of the main screen to manage your businesses. Each business has its own color, and expenses are completely separate.
From the business picker, tap Combined View to see a read-only list of all expenses across all businesses, with cross-business totals and a combined PDF export.
When viewing a specific business, use the < Business Name > arrows in the sub-header to quickly switch between businesses without going back to the picker.
Recurring Expenses
Tap the repeat icon () in the top bar to manage recurring expenses — things like monthly SaaS subscriptions, rent, or insurance premiums.
Set a payee, amount, category, and day of the month. Spndle will auto-post the expense on that day each month. If you open the app after a posting date has passed, any missed postings are added automatically.
Accounts (Customers)
If you do client work and want to track revenue and expenses by client, tap the people icon () to manage accounts.
Each account (client) shows total revenue, attributed expenses, and net P&L. You can export a per-client statement as a PDF or CSV.
When adding an expense, optionally attribute it to an account using the account picker at the bottom of the form.
Exporting
Tap the share icon () in the top bar to open the export sheet. Choose a date range, then select a format:
- PDF Itemized List — every expense in a formatted, color-coded table grouped by Schedule C category. Great for your accountant.
- PDF Schedule C Summary — category totals with IRS line numbers, ready to transcribe to your return. Includes a meals 50% deductibility note.
- CSV Itemized — all expense data in a spreadsheet-friendly format for Excel or Numbers.
- CSV Schedule C Summary — category totals in CSV form.
In Combined View, you can export a combined PDF or CSV covering all businesses at once.
Settings
Tap the Settings icon () in the top bar to open Settings.
AI Receipt Recognition
Enable Claude AI, enter your Anthropic API key, and select the model. See the Smart Receipt Scanning section above for details.
Trip Tracking
- IRS Mileage Rate — defaults to $0.67/mile (2025 IRS standard rate). Tap to edit if the rate changes.
- Auto-Stop Time — how long Spndle waits after you stop moving before ending a trip. Options: Never, 5, 10, 15, 20, or 30 minutes.